The Power of Automated Leave & Absence Workflows
- Ana Inés Urrutia
- 18 ene 2023
- 3 Min. de lectura
A workflow for leave and absence requests within Dynamics 365 Human Resources can automate the process of submitting, approving, and tracking employee leave requests. This can include the following steps:
Employee submits leave request: The employee can use a form within Dynamics 365 to submit a leave request, including the start and end dates of the requested leave, the type of leave (e.g. vacation, sick leave), and any relevant notes or comments.
Auto-approval: Depending on the type of leave and the employee's remaining leave balance, the request may be automatically approved by the system without the need for further review.
Manager approval: If the request requires further review, it is sent to the employee's manager for approval. The manager can view the request details, approve or reject the request, and add any comments or notes.
Notifications: Depending on the configuration of the workflow, notifications can be sent to relevant parties, such as the employee, the manager, and the HR staff, to keep them informed of the status of the request.
In this article, we will dive into two standard workflow configurations: Auto approve and Manager approve. Please note that these are two simple scenarios, you can add complexity if you want but these are the main workflows you will come across during D365 HR implementations.
⚠️ Before we start just a reminder: if you don´t have your position hierarchy created in Dynamics 365 Human Resources nothing is going to work. Make sure to check that out before starting. ⚠️
Auto approval
Auto approval means that once the users send the request, it will be approved. This is used in some scenarios for sick leave. Below you will find the step-by-step with all the guidelines on what you will need to do.
In this first screenshot, you will have just the box and the start and end. Sometimes you will need to drag the Approval leave request inside the yellow box. Connect the start with the approval box and the approval box with the end.

Next, you'll go to Properties, where you will find four different tabs, review them all.
1. Basic settings: name your workflow

2. Automatic actions: select the automatic action condition.

3. Notifications: manage notifications.

4. Advanced settings: mark as follows

When this first part is sorted, you'll need to step into the tiny box with the Automatic Approval name. Once again you'll have four tabs to add/edit information. Go to Properties.
1. Basic settings: for notifications, create the work item subject as well as the instruction. You can include placeholders.

2. Assignments: You will have four tabs to complete.
Assignment type: Workflow user

Workflow user: workflow originator

Time limit: I always use one week, you can use another timeframe that works for you.

Completion policy: as shown below

3. Condition: always run this step.

4. Escalation: leave it as it is.

The auto-approve workflow has been created! You can now assign it to a specific leave type.
Manager approval
The manager approval workflow I will guide you will help escalate requests to the first-line manager, using a managerial structure. This means that every time this workflow is used, the manager of the employee will receive the request to manage it.
In this first screenshot, drop the approval leave request box inside the yellow box and connect the start with the approval box and the approval box with the end.

Next, you'll go to Properties, where you will find four different tabs, review them all.
1. Basic settings: type the name of your workflow, select the owner, and a submission instruction., If you have templates configured you can add them here.

2. Automation: leave it as it is.

3. Notifications: enable the ones you want.

4. Notes: add notes if needed.

When this first part is sorted, you'll need to step into the tiny box with the Approval name. Once again you'll have four tabs to add/edit information. Go to Properties.
1. Basic settings: enter a name.

2. Automatic actions: I recommend leaving it as it is.

3. Notifications: select the one you want.

4. Advanced settings: tick the boxes you want.

The last step is to select the tiny box with the name Approval in it. We will also go into the Properties tab.
1. Basic settings: enter a name, select a work item subject and instructions. You can use placeholders if needed.

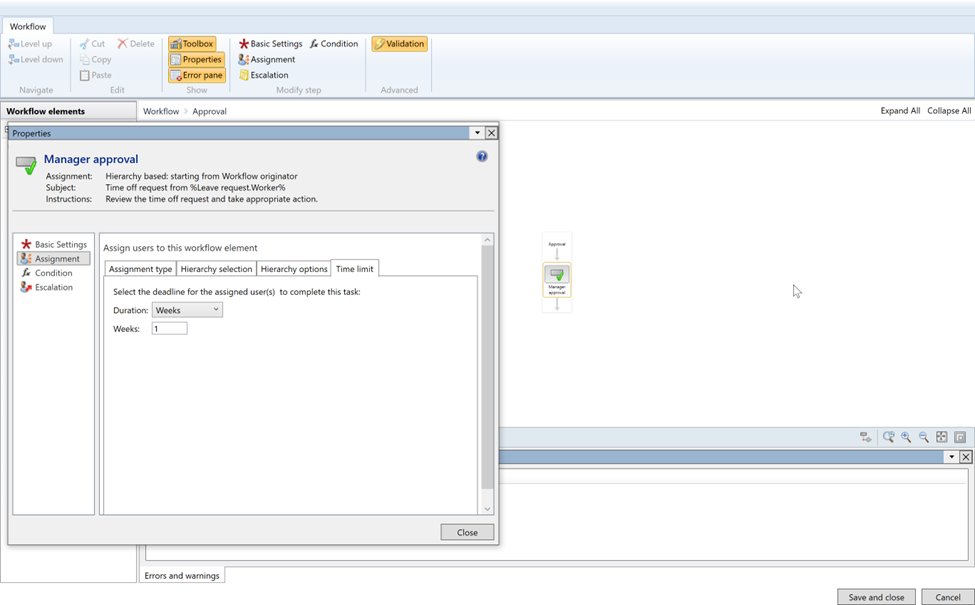
2. Assignment: this is possibly the part that took me a bit to understand when I first started. Make sure you complete as follows, after you get this sorted you'll be free.
Assignment type: select Hierarchy

Hierarchy selection: select managerial hierarchy, then workflow originator. Below you will find this:
Where EmployeeLine manager level = value = 1
This line means basically that when the request is sent, it should go to the direct manager of the workflow originator.

Hierarchy options: assign to all users retrieved.

Time limit: chose as you like.

3. Condition: select always run this step.

4. Escalation: in this case, we are going to leave it as it is.

Hope this blog helps you!
Comments