HR Sentiment analysis with Power Automate + Power Virtual Agents + Microsoft Teams
- Ana Inés Urrutia
- 27 oct 2022
- 4 Min. de lectura
Actualizado: 28 oct 2022
This wasn't an easy post. It was difficult getting to work with Power Automate and actually understanding how it works, BUT, I made it. As Lady Gaga said, you can do anything if you put your mind to it, so here I am...
In this article, we will see how we can use the sentiment analysis functionality from AI Builder to collect inputs and answer them in 3 possible scenarios: positive, negative, or neutral.
We will need:
Power Automate: https://make.powerautomate.com/
Power Virtual Agents: Power Virtual Agents (microsoft.com)
Microsoft Teams
First step: Power Virtual Agents
Power Virtual Agent will be the bot that communicates with the employee. You will see later on that because we want to add this solution to a scenario the workers already know, we will add this Power Virtual Agent (step 3).
1. Log into Power Virtual Agents (microsoft.com), complete the form and select Create.

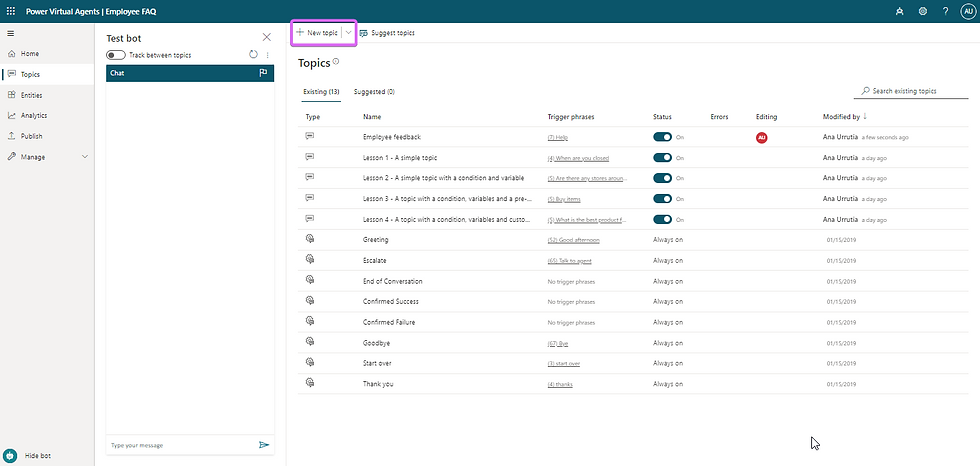
2. Under topics, select +New topic and name it as you want. In my case, the topic is already created. I decided to name it Employee feedback, you'll see why.

3. List the trigger phrases that you want your bot to respond to, once you have them listed, add them to the Trigger Phrases box:

4. Add a message and then a question. While adding the question, please notice that you'll need to change some defaulted values and options as shown in the video below.
Just in case you missed the content from the recording. Notice that after adding the question I changed:
Identify: User's entire response
Save response as: VarUserResponse
5. Add an action and then select Create a flow

At this point, a new tab for Power Automate will open looking like the picture below.

Second step: Power Automate
Power Automate will basically analyze the sentiment of the phrase the employee is inputting in the system, and after processing the response will give the worker different answers and take some actions with the HR Team.
In the first box, complete as shown:

2. Add an action and chose to Analyze positive or negative sentiment in text. Complete as follows.

3. Add another action and select Initialize variable. Complete as shown.

4. Add a new action and choose Initialize variable. Complete the fields as follows:

5. Add an action and select Switch and complete the On variable:

6. Now is when you need to decide how your bot will reply to positive, negative, and neutral inputs. If you are lacking in inspiration see what I've done.
Case: positive. Choose set variable and complete it with the name and text you want people to receive in positive cases.

Case: negative. This case is a bit different because it is a negative input and we want to escalate the feedback received to the HR Team through email. As you can see the first step is the same as the positive case, but here I added an additional step: Send an email (V2) completing the "to" "subject" and "body". Notice that in the body I added a Dynamic field so people receiving the email are aware of the response that was submitted and they can take proper action.

Case: neutral. Luckily this one is simple and pretty similar to the positive one. Complete as follows.

7. We want to save this feedback and sentiment. To do so, we need to select the Create item under Sharepoint actions. You will need:
Site address
List name
Title

8. We will return these values to our HRBot - Power Virtual Agents.

The entire flow you just created must look something like this:

Back to the first step: Power Virtual Agents
1. Once the flow is created, you will notice this new box completed with new information:

2. You'll need to add a new message and include the variable Response.

Step 3: Publish the Power Virtual Agent on Microsoft Teams
Using Microsoft Teams is a smart decision, as adoption will be pretty easy. Employees are used to Teams doing basically everything.
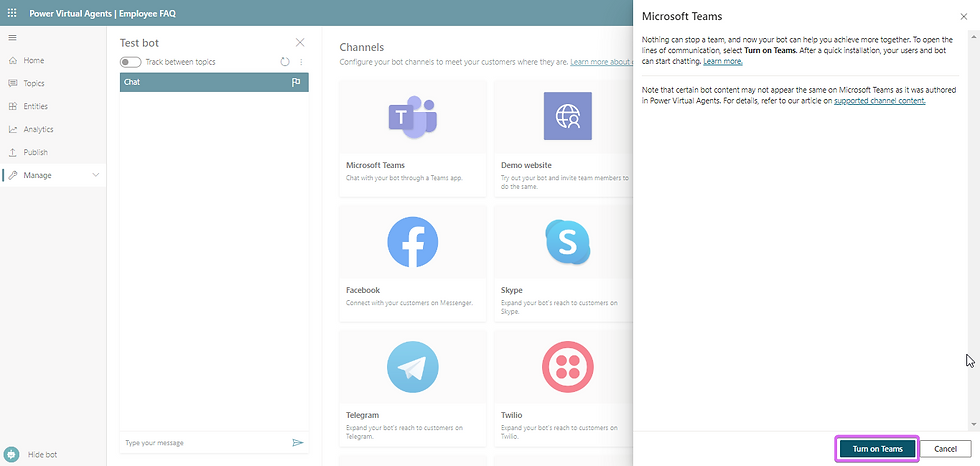
1. In Power Virtual Agents, go to Publish and select Go to Channels.

2. Select Microsoft Teams.

3. A new tab will open. Select Turn on Teams.

4. This tab will open, select Edit details.

5. Change details if you want to, once you are done select Save.

6. Let's make it happen! Select Publish.

7. Confirm.

8. This is the good sign we are looking for:

HR Bot in action!
1. Make sure you add the bot to Microsoft Teams.

2. Let's try it out
Positive: this is the cool one. Everything we are looking for.
Negative case: because this is a tricky one we will have 2 things. The chat itself, and the email that will be sent to the HR Team. Let's see both:

Neutral: the meh one.
Check the run
In case you are a freak control as I am, and want to understand what happened in the back end, you can check the flow. Go to make.powerautomate.com and check the details of the flow we just created.

We will review the last 3 cases as they are the ones I showed in the previous section.
Positive

Negative

Neutral

Did you like my content? If so, please share it on social.
Thanks for reading!
Opmerkingen